Results from Energy Audit

7 12 2008

As you can imagine, I was so excited to receive the results from the
energy audit we had done on November 4th. Jimmy from ASK construction came over to review the list of recommended measures and the related costs.

As I mentioned in the previous post about the audit, ASK came to us very highly recommended so I’m not particularly concerned about being taken advantage of but since the repairs will be completed by the same company that performed the testing, there is a serious opportunity for customer-gouging. I’ll put in a call to NYSERDA to see what their response is about this. But I digress.

Let’s start with the related to Health|Safety work. The following measures are related to isolating the boiler room and insuring adequate fresh air for the equipment.

  1. Install 1 fire-rated door at Boiler Room
  2. Seal ceiling of Boiler Room
  3. Install fresh air louver (required since we’re isolating the Boiler Room)
  4. Install additional Carbon Monoxide/Smoke detectors

The total for this work is $2,065. These are all very important items we have been meaning to do for a long time and I’m so happy we’re finally doing then. Since this work is not directly related to energy conservation, it is not eligible for rebates or incentives (more about this later).

Now to the sexier stuff: Energy Conservation Measures:

  1. Insulate Main Roof with cellulose to R-43 value (including the roofs of the front and rear previous additions which are really cold in the winter). Cost: $1,890.00
  2. Insulate crawl space at Basement below the front room with High Density foam to R30 (foam allows it to stick to the underside of the ceiling). Cost: $1,350.00
  3. Insulate exposed basement wall with cellulose to R-12 value. Cost: $140.00
  4. Air sealing including: Seal at back wall of meter room, Install new interior vestibule door and install louver at exterior Basement entry door to make a weatherproof vestibule at the Basement, weatherstrip at front entrance door, close up and insulate existing opening at 2nd floor ceiling. Cost: $1,350.00
  5. Install CFL’s (compact fluorescent lights), I’ll specify them after I figure out which ones we need. Cost: $250.00
  6. Replace the Kitchen exterior door with new door and storm door. Cost $1,250.00
  7. Install chimney cap & liner. Cost: $250.00
  8. Remove and repair roof at abandoned skylight. Cost: $300.00
  9. Replace two sections of bent gutter that was not draining properly. Cost: $1,250.00

We’re also going to add an air exchanger for approx. $1,200.00. We currently have an in-line exhaust fan which is basically a fan inside a little duct located in an 8″ diameter hole in the Basement wall that sucks air out of our house when it is turned on. The fan is uninsulated and pulls unconditioned air back into the house through various existing openings. An air exchanger is a mechanical ventilation system that exhausts all the air in a particular area of the house replaces it with fresh air 6x/ day (these are called air changes). Since most of the year, the air outside is too hot or too cold to bring into the house directly without heating or cooling it and thus adding energy costs, an air exchanger will pre-heat or -cool the air to allow fresh air to come in without terribly impacting the heating/cooling system and will help remove moisture from the Basement.

The sub-total for all this work is approx. $11,295, less the $350 we paid at the audit for a total of $10,945. Of this, $8,880 is eligible for incentives as follows:

National Grid: 20% of work up to max. $750

NYSERDA (Tier 3): 20% cash back up to max. $4,500

$8,880 – $750 (National Grid) – $1,776 (NYSERDA 20% of $8,880) = $6,354.00 for the energy conservation work + $2,065 for the Health | Safety work for a total of $8,419.00

That is a hefty savings for this amount of critical work. As for energy savings, they calculate approximately $489/year in electrical and gas savings for a payback of about 13 years which will certainly come sooner as energy prices rise.

More about the incentives:

NYSERDA has 3 tiers of incentives:

If your project includes 2 of the following types of measures, the incentive is 10% cash back.

If your project includes 3 of the following types of measures, the incentive is 15% cash back.

If your project includes 5 of the following types of measures, the incentive is 20% cash back.

  1. Air sealing
  2. Insulation
  3. Domestic hot water
  4. Heating equipment
  5. Windows and eligible doors
  6. Mechanical ventilation
  7. Appliances
  8. Lighting and fixtures
  9. Distribution system
  10. Cooling equipment.

Hitting 5 (or more) of these categories of measures is not difficult if you have an old leaky house like ours.

In addition, since we’re doing this work during 2009, we’ll be eligible for an additional $500 Federal Residential Energy Efficiency Tax Credit but we won’t see that money until 2010 tax time.

And they gave me a nifty report – all the site-specific items were incorrect though (age of home, size of home, age and efficiency of boiler) but these items were not relevant to the repairs so I’m putting this down to Architect’s persnickityness.

Stay tuned. Repairs expected first week of January.


Insulation Project: Comprehensive Energy Audit

6 11 2008

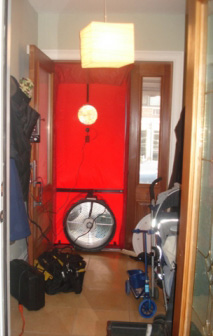
blowerdoorJimmy and John from ASK Construction came over to do a Home Performance Energy Audit (a comprehensive energy and safety inspection) of my home.

First they did a fairly quick survey inside and out to determine the overall volume of the house, including the size of all the windows and doors.

The Audit was divided into 2 parts: Energy Efficiency and Health|Safety.

The items they looked for in the Health|Safety category are fairly obvious but are often overlooked including:

  • Adequate Carbon Monoxide (CO) coverage: in addition to having a sufficient number of detectors, each needs to be located such that if one of them is activated, all the occupants will hear the alarm, no matter where they are in the house.  Suggested locations are: at the top of the Basement stairs in case there is a problem with the mechanical equipment and just outside the kitchen because when you turn on your oven, carbon monoxide levels of 700-2000 parts per million can accumulate until they are vented away by your hood exhaust.
  • They checked all the mechanical equipment in the house to see if there was any carbon monoxide (CO) leakage (there wasn’t any), and that there is adequate fresh air intake and exhaust (there’s plenty).
  • They checked to make sure all mechanical gas-fired equipment was enclosed in a fire-rated room (this item needs a little work).
  • They checked that the bathroom exhaust fans were working properly.  An adequate bathroom exhaust fan should run for 20 minutes after a shower to remove the moisture from the room. (Ours are pretty good – loud but powerful).
  • At the Basement, where we have a de-humidifier running all year round, they tried to determine where the moisture was entering from (I think it’s from along the side garden wall – more difficult to fix than if it was just the rear wall at the backyard) and we had a long discussion about what kind of exhaust fan to install.

Now for Energy Efficiency (!)

Heating/Cooling system: First they had me turn the thermostats for the furnace way up so they could check if there was any leakage in the air ducts.  Turns out that there was a 50% drop in pressure when they added up the measured supply of air in each room.  Unfortunately, these ducts are concealed in the ceiling – this wastes a lot of energy in both the heating and cooling seasons because a lot of conditioned air is wasted heating and cooling the duct enclosure so expect to see big holes in the ceiling sometime soon so we can get in there and repair the ducts.

Air Infiltration: Jimmy and John tested all the windows to make sure they were operational and then closed up all the doors and windows for the blower door test – that’s what is going on in the picture above.  The idea is to close up the house and then measure the volume of air that leaks in from openings in the building envelope and locate the source of those air leaks so that they can be corrected.  The red fabric shown in the picture is stretched over a temporary frame in the door (you can sort of see the digital gauge attached to the edge of the door that measures the air flow).  Jimmy said the air leakage in the house didn’t seem so bad but he wanted to do the calculations back in his office to confirm.

We have an opening in the ceiling in one of the bedroom closets in order to access some valves and it was totally screwing up the test so they taped the door closed to get the proper seal.  Apparently, it’s openings like this that can suck out your heat in the winter and conditioned air in the summer.  Closing up this opening will be a high priority.

Windows: John mentioned that our aluminum windows with double-pane glass, circa 1990’s could be improved.  I know that vinyl or wood windows are more efficient (vinyl and wood are better insulators than aluminum) and new double-pane glass comes with Low-E coatings and can be filled with argon glass for added efficiency but these types of new windows are VERY expensive and I don’t think they will fit in our budget for a while.  In the meantime, we will invest in high-efficiency double-honeycomb shades to better insulate at the windows.

Insulation: John made a small hole in the wall adjacent to the garden and found that it was PACKED with fiberglass insulation.  This is very good news.

Costs:

As for costs, the audit cost $350 which I believe will be refundable by the Home Performance with Energy Star Program if we do more than $2,000 worth of weatherization work (which seems likely).  Having completed the audit, we will now be eligible to take advantage of the incentives offered by the program which can be up to 20 per cent cash back on the total amount of eligible measures, plus federal and state tax credits.  The whole point of this exercise is to improve the efficiency of our home so we should also expect to see a large cost savings in our heating and cooling costs.

I expect the full report in about 10 days, after which we will start the corrective work to repair all deficient conditions.


Insulation Project: Free Energy Audit

7 09 2008

At our request, an experienced and knowledgeable auditor from National Grid (formerly Keyspan) came over to do a free energy audit.   We walked through my entire house and reviewed all the potential for saving money through weatherization.  I learned a few interesting things.

Basically NYSERDA (New York State Energy Research & Development Association) has money available for very low-interest loans (they’ll write down up to 6% of the loan) and rebates up to $750 for weatherization work.  The problem is that not enough New Yorkers are taking advantage of these programs so they launched this free energy audit program to promote participation.  You can find out more information at www.getenergysmart.com

The general principle of weatherization is: Seal up air leaks and insulate the entire house.  Start from the top and work your way down. Based on the visit, I changed the plan of the work I want to do in our house.

The original plan was 4-fold:

1. Roof: The area below the roof and above the 2nd floor ceiling is called a cock-loft. It is currently uninsulated and unvented. I want to blow in insulation and vent it to prevent mold build-up and heat loss in the winter and heat gain in the summer.  The Auditor confirmed that this is definitely the highest priority.  I want to get this work done soon before the heating season arrives.

2. Exterior Wall: We have an approximately 800 SF of North-Facing wall which faces a community garden. It is brick construction with a layer of stucco, now cracked in many places. There are 3 windows on the wall which will need to be dealt with carefully. Our idea is to insulate the wall and paint it so that it can receive a mural painted by a community group.  Surprisingly, the Auditor said that this was much less important in terms of heat loss and heat gain.  Good thing because this work would be the most expensive of the bunch.

3. Basement ventilation: We installed a fan a few years ago to ventilate the Basement. Unfortunately, due to a mis-communication with the contractor, we ended up with the kind of vent that has a cover manually controlled by a chain which basically means we have an 8 inch diameter hole in the Basement wall.  Yes, this is something the Auditor agreed we should do.  It is important to remove moisture to prevent mold and mildew build-up year round.  He also pointed out that we need better Fresh Air Intake for our boiler.

4. Boiler Room: The boiler room is located adjacent to the exterior wall and is completely uninsulated. The plan is to insulate the room as well as the boiler, hot water heater and all exposed pipes.  The Auditor said that the amount of heat we are losing through the wall to the outside is negligible and since the Boiler Room is located at the Basement, most of the heat migrates out to the occupied rooms in the Basement or up to the main living floor and can be used.  It would be somewhat difficult to install sheetrock at this wall anyway because there are pipes and valves adjacent to the wall which would interfere with the studs and there really isn’t any available insulation you can install in a boiler room that is fire resistant without being enclosed in sheetrock.

Remember how excited I was when we installed a jacket at our hot water heater?  Turns out we didn’t really need it.  If you put your hand on top of the hot water heater and it feels cool, you don’t need to add insulation, it is internally insulated.

5.  When we ask the contractor to install the insulation at the attic space, I’ll also ask him to insulate the walls and ceiling of our front room and kitchen which were built years ago as additions to the original house and are really cold and uncomfortable in the winter.

One very interesting thing I learned is that it is extremely inefficient to install high-hats (recessed lighting fixtures) at the top floor of a house because each one acts as a little chimney, pulling heat away from the living spaces and into the attic or directly out of the house, even if you have CFL’s in them.

In all it was a great visit, and we got 2 free compact fluorescent bulbs to boot!

For all the posts about the Insulation Project, click here.